


Create Planner Tasks with Microsoft Form Attachments
Method for adding Form attachments to Planner tasks using Power Automate and Logic Apps


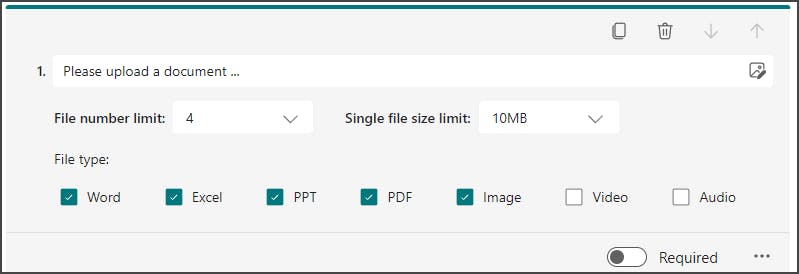
Form Options
There are several options available when file uploads are enabled for Microsoft Forms:
Can be optional or required
Can be limited from 1-10 attachments
Can restrict to certain file types
You can construct workflow logic around these options, but it's usually best to handle a multitude of scenarios, in case the form or connector changes later.
Storage Locations
Attachments for both types of Forms are stored in different locations:
| Form Ownership | Location |
| Personal | Stored within the form creator's OneDrive, under ...\Apps\Microsoft Forms\ |
| Group | Stored within the group's file storage, within the General folder for the associated Team |
Tip: Using the same group for both the Form (source) and Planner board (destination) simplifies permissions and avoids the need to move attachment content.
Workflow Logic
The automation is triggered by new form submissions. With each run, the details for each submission are collected and a corresponding Planner task is created.
Optionally, add a condition to determine if attachment(s) were included in the form response, so the subsequent logic can account for both scenarios:

You will need an expression to determine if the file upload "question" within the form is empty or not:
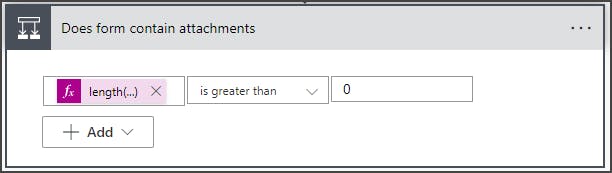
The expression uses a length function on the question within the form that collects attachments. If the outcome is greater than 0, the workflow will "know" attachments were included and can respond accordingly:

Within the Yes branch of the condition, use a Select action to convert the array of form attachments into a format compatible with Planner. Once complete, it will look like this:
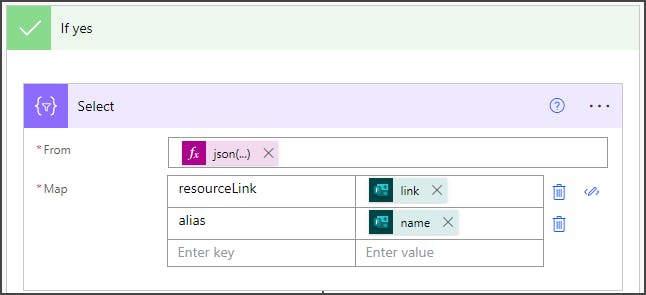
For the From field, wrap the dynamic value used above (your attachment "question" within the form) inside a JSON function:

Next, map two properties - resourceLink and alias. Toggle to advanced/text mode...

...and paste the following snippet:
{
    "resourceLink": @{item()?['link']},
    "alias": @{item()?['name']}
}
Once that's complete, add an Update Task Details action, using the ID value from the preceding Create Task action:

Switch to advanced mode within the References section of the Select action and add the Output from the previous Select statement:
Note: attachments in Planner are known internally as references

At this point, your attachment handling logic should be complete.
Create a test form submission, and you should see a task card with the correct attachments included:

Don't forget to go back and complete the No path for the "does the response contain attachments" condition, and incorporate any additional logic you might need in the workflow.